
What is Uddiyana Bandha?
10th May 2019
10 Foods You Didn’t Know Were Good for Your Skin
17th May 2019Yoga for the Pelvis
Too often in life, tightness in the muscles around the pelvis goes unnoticed. If left untreated, the tension in this area can lead to long-term pain and discomfort. With this in mind, maintaining a balance of stability and flexibility in the muscles is important for both yoga practice and day-to-day life. In this article, we explore yoga for the pelvis in more detail. To practice the postures below, all you’ll need is a quiet space and a comfy yoga top.
Reclining Big Toe Pose
To practice Reclining Big Toe Pose, begin lying flat on your back. Next, bend both knees while keeping the soles of your feet on the ground. Gently lift your right leg off the mat and draw your knee into your chest. If necessary, use your hands to pull your knee in. Slowly straighten your left leg and place it down on the ground. Using your hands, gently grip the toes of your right foot. If you can, straighten your right leg. If your leg doesn’t straighten all the way – don’t panic! As long as you can feel the stretch through your ankle and calf, the asana is doing its job. You are in Reclining Big Toe Pose. Hold the posture for 30 seconds before repeating on the other side.
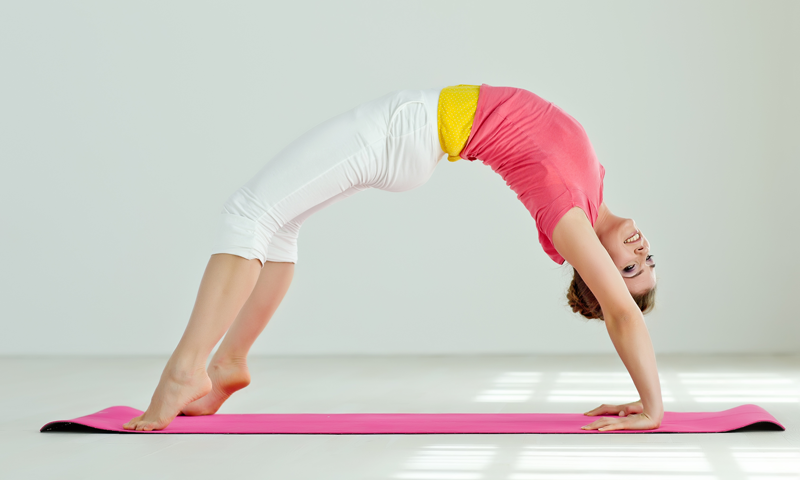
Bridge Pose
To practice Bridge Pose, start by laying on your back. Gently bend your knees whilst keeping the soles of your feet on the ground. Next, relax your arms and let them drop to the sides of your body. Bring your chin into your chest and lift your bottom and back off the mat to create a bridge. You are in Bridge Pose. Hold the posture for 30 seconds before lowering yourself back down to the mat.
Cat/Cow Pose
To practice Cat/Cow Pose, begin on all fours with your wrists aligned with your shoulders and your knees aligned with your hips. Next, take a deep breath in as you drop your belly button toward the ground and draw your shoulders back. You are now in Cow Pose. Hold the position for around 5 breaths. On your final exhale, tuck your chin into your chest and round your back toward the ceiling. You are in Cat Pose. Switch between the two positions for a few minutes for best results.
Garland Pose
To practice Garland Pose, stand tall with your feet directly beneath your hips. Keeping your spine as straight as possible, push your hips back and down as if you’re sitting in a chair. You are in Garland Pose. For best results, bring your hips as low as you can without bending your spine. To make the posture easier, place a rolled-up towel beneath your heels to stop them from lifting off the ground. To further open your hips, bring your palms together in front of your chest and push your elbows into the inner knees.

Half Frog Pose
To practice Half Frog Pose, begin lying flat on your stomach. Next, bend your elbows and prop yourself up on your forearms. At this point, your forearms should be parallel to each other. Turn your left arm until your fingers point towards the top left corner of your mat. Bending your left knee, reach your left arm back to grab ahold of your left foot. To increase the stretch, slowly pull your foot in towards your bottom. You are in Half Frog Pose. Hold the posture for 30 seconds before repeating on the other side.
King Pigeon Pose
To practice King Pigeon Pose, kneel on the floor with your legs hip-width apart. Your shoulders, head and hips should all be directly above your knees. Reach your hands behind you and place them on your lower back. Without pushing your hips forward, tuck your chin into your chest and lean your head and shoulders back. With your shoulder blades back, draw your chest toward the ceiling. Once your chest is lifted, continue to tilt your head backwards.
Next, bring your hands forward in front of your sternum and reach them over your head toward the floor. To maintain balance, bring your hips forward as your upper body reaches back. As you drop back, try to keep your thighs at a 90-degree angle from the floor. Rest your palms on the mat with your fingers pointing towards your feet.
Engaging your arms, raise your head off the floor and lift your hips. As you do so, extend your spine and carefully walk your hands to your feet. Bring your forearms toward the floor and grab your ankles. Rest your elbows on the mat, positioning them so they are shoulder-width apart. Lengthen your neck and rest your forehead on the ground. As you breathe in, expand your chest. As you breathe out, press your lower-legs and forearms against the mat. You are in King Pigeon Pose. Hold the pose for 30 seconds whilst breathing deeply.
In Summary
If you’re experiencing pain or discomfort around your hips, the muscles around your pelvis may well be tight. Thankfully, this can easily be cured by practising the postures above. Before practising yoga for the pelvis, remember to pick up some good quality yoga clothes. A flexible material is essential for stretching, and breathable fabric will allow your muscles to breathe. When the weather is nice, some yogis like to practice outside. If this sounds appealing, go for it! Take your mat into your garden or local park and get some much-needed vitamin D. To protect your skin from harmful UV rays, remember to wear a yoga cap and some sunblock.